FAQ & Troubleshooting
Frequently Asked Questions (FAQ)
What is the fastest backup destination method?
Fastest backup destination will be either Local storage (provided that it's on a separate device), or remote SSH destination (provided that the bandwidth is very high and fast).
For best performance, it is also recommended to exclude files/folders, and disable backup for suspended accounts.
Does JetBackup provide backup storage?
JetBackup is a backup management software that allows you to choose your own backup destination storage. It does not however provide or come with its own storage space. Click on Destinations Overview for a list of all supported desinations.
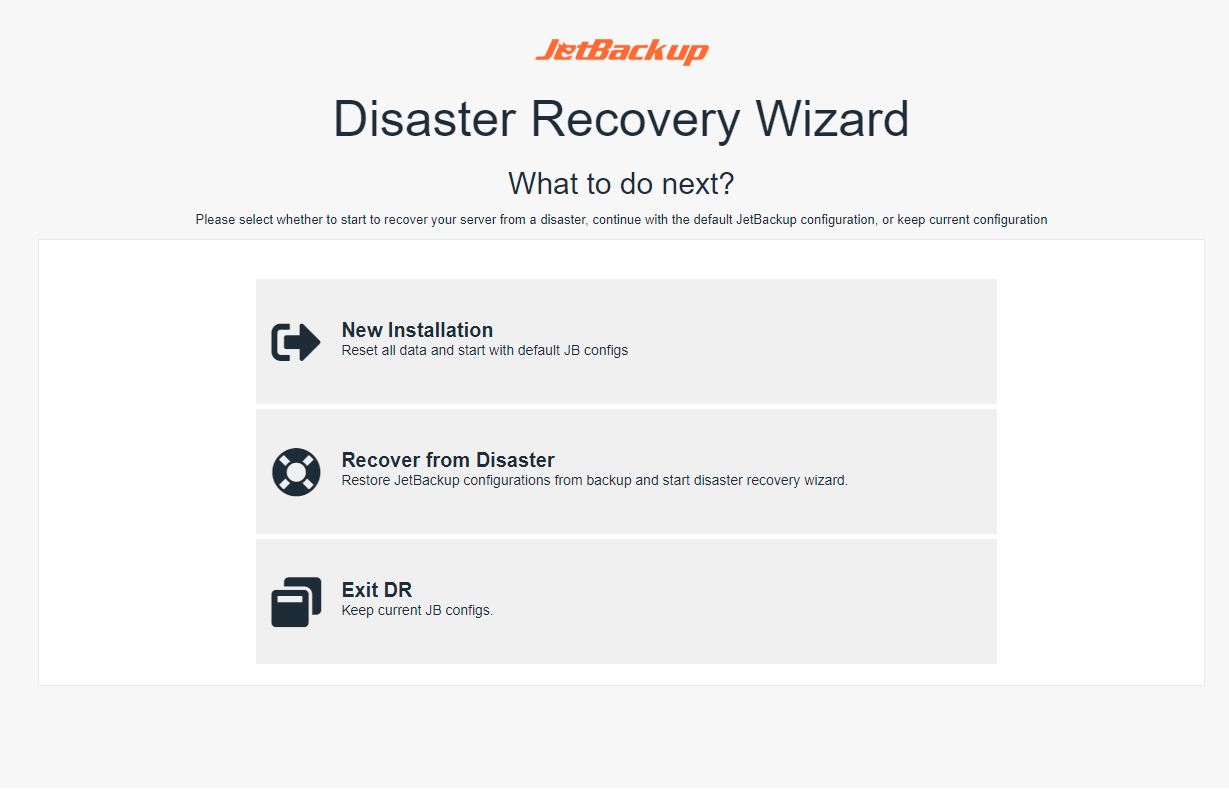
How to perform Disaster Recovery without Master Encryption Key?
- Set up your server.
- Install your supported control panel.
- Install JetBackup. For more information visit Installing the JetApps Repository.
NOTE: When perforning Disaster Recovery without the Master Encryption Key, you will be limited to exclusively restoring from read-only destiantions. All previous JetBackup Configurations (Destinations, Backup Jobs, etc.) will not be restored and JetBackup will not be able to continue backups from where it left off. This means that JetBackup will have to start generating new backups from scratch. To see how to perform a standard Disaster Recovery, visit Recover from Disaster
- Go to General Setting and change the Days to keep orphan backups value to 0, so JetBackup will not auto remove these files.
- Create New Destination, point the Backup Directory path to the same location where your backups are stored, and Enable Read-Only Mode. Note: If you do not want to add the destination as Read-Only please see the KnowledgeBase Article: Using the same backup destination for multiple servers
- The Destination will automatically reindex after creation.
If the path is set correctly this should index all your snapshots.
How to Manually Restore account from SSH/Local destinations
The steps to manually create a compressed archive in SSH/Local destinations that can be used with jetbackup5 CLI commands is listed below:
- Find the account path on the storage destination, ie /path/to/backup/{USER}_{UUID}/snap.1
[root@server {USER}_617969f43c597a40442a3391]# ll
drwx------. 12 root root   4096 Dec 24 15:28 snap.1
drwx------. 12 root root   4096 Dec 24 15:00 snap.2
- Copy the snap.x folder contents to a new folder called backup/ in that same directory using
cp -av snap.1/ ./backup
# Output will be similar to the below:
‘snap.1/’ -> ‘./backup’
<snipped>
‘snap.1/config/{USER}123.tar.gz’ -> ‘./backup/config/{USER}.tar.gz’
- Compress the entire ./backup directory you just created with
tar -czvf jetbackup5-{USER}.tar.gz /path/to/store/archive. - Using your preferred method, transfer the backup to your other server that has JetBackup 5 installed.
- Then, run
jetbackup5 --restorepkg jetbackup-{USER}.tar.gz -vto restore the backup with verbose output. The restore should be completed successfully on the new server.
# Output will be similar to the below:
[24/Dec/2021 15:48:31 +0000] [PID 2804] JetBackup Version: 5.2.5 Panel Version: cPanel 5.2.5 (EDGE)
[24/Dec/2021 15:48:31 +0000] [PID 2804] Starting restorepkg script
[24/Dec/2021 15:48:31 +0000] [PID 2804] Decompressing backup
[24/Dec/2021 15:48:31 +0000] [PID 2804] [DEBUG] Tar Command: tar -x -z  -f jetbackup-{USER}.tar.gz -C /usr/local/jetapps/usr/jetbackup5/workspace/restorepkg/16403609112vUcYw2e1
[24/Dec/2021 15:48:31 +0000] [PID 2804] Parsing index file
<snipped>
[24/Dec/2021 15:48:42 +0000] [PID 2804] Executing panel post restore
[24/Dec/2021 15:48:58 +0000] [PID 2804] Restore completed
Restore completed
How to add External MongoDB Configuration
In order to add you own external MongoDB Configuration please edit the file located at /usr/local/jetapps/etc/jetbackup/config.inc and add the following fields:
define('MONGODB_PORT', '1234');
define('MONGODB_HOST', '1.1.1.1');
define('MONGODB_USER', 'user');
define('MONGODB_PASS', 'pass');
define('MONGODB_DATABASE', 'db');
Once the file has been saved, restart the mongod service using the following command:
/usr/bin/systemctl restart jetmongod
How does JetBackup Prioritize which tasks to run first?
There are 2 underlying priority systems at work in JetBackup 5, both of which works so that the lower the value, the higher its priority on the queue. The systems are as follows:
- Account Type Restore Priority - For restore tasks at the backend, JetBackup 5 prioritizes account types and assigns an associated (hard-coded) priority value as such:
- Admin Accounts: 1000
- Reseller Accounts: 10000
- User Accounts: 100000
This ensures that when there are multiple accounts queued for restore, the parent accounts (admin > reseller > user) are restored first before their corresponding child accounts. Please note that this system only affects the restore process.
- Queue Priority Groups - This allows you to specify and group accounts by priority at the admin level, allowing you to finetune how JetBackup prioritizes tasks for each account. This can be reached by navigating to Settings > Performance Tab > Queue > Manage Queue Priority Groups Button.
When adding/modifying a queue priority group, you have the option to set priorities by the following tasks:
- backup priority
- restore priority
- download priority
You also have the option to associate an Account Tag for a priority group.
Now with regards to assigning priorities to accounts, you can navigate to the Accounts page, select the desired account then click Manage Account. Once on the modify account page, you can either set the Account Queue Priority Group Override setting or assign an Account Tag with the associated queue priority group.
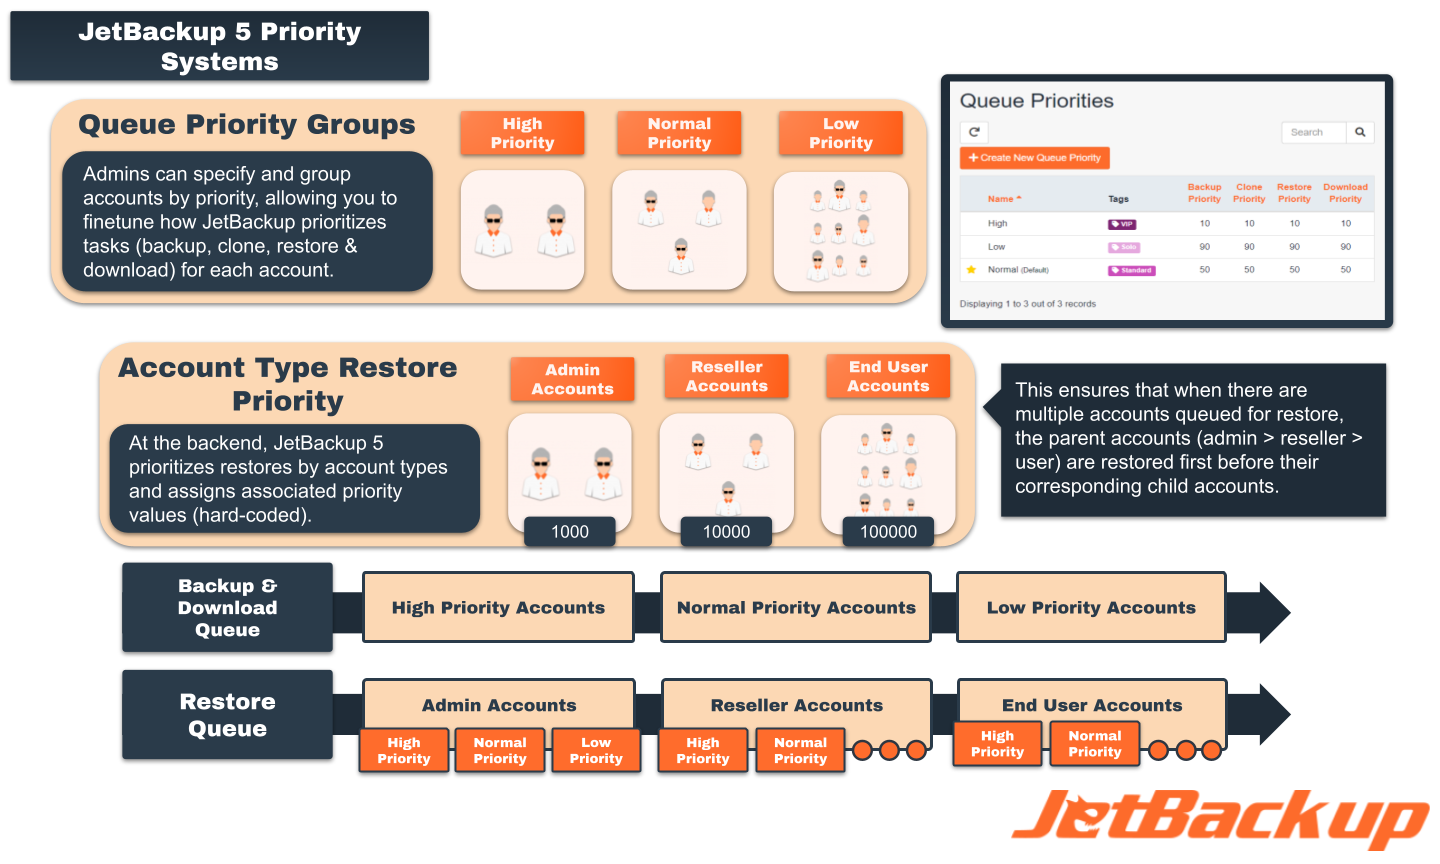
To set an example, let's say we have the following configured in JetBackup 5:
Queue Priority Groups with corresponding priority values
- High - 10
- Normal - 50
- Low - 99
Accounts with assigned Queue Priority Groups
- admin_acct1 - High
- rslr_acct1 - Normal
- rslr_acct2 - Low
- usr_acct1 - Normal
- usr_acct2 - Low
Here will be the priority values for each account on the following tasks:
| Account | Restore | Backup & Download |
|---|---|---|
| admin_acct1 | 1010 (1st) | 10 (1st) |
| rslr_acct1 | 10050 (2nd) | 50 (2nd/3rd) |
| rslr_acct2 | 10099 (3rd) | 99 (4th/5th) |
| usr_acct1 | 100050 (4th) | 50 (2nd/3rd) |
| usr_acct2 | 100099 (5th) | 99 (4th/5th) |
Troubleshooting
The JetBackup 5 Services
One major change from JetBackup 4 to JetBackup 5 is the introduction of JetBackup 5 Daemons. All JetBackup 5 processes (backups/restores/downloads/etc) are handled via the following services:
- jetbackup5d - The jetbackup5d service is our main service which handles all queue processing, automated tasks, and display. Check its status using the following command:
/usr/bin/systemctl status jetbackup5d
- jetindexd - The jetindexd service is part of the new Indexing Engine that JetBackup 5 uses for the new S3 Compatible Plugin. The jetindexd service stores all snap information locally allowing JetBackup 5 to perform incremental backups to all vendors without the need to read from the destiantion. Check its status using the following command:
/usr/bin/systemctl status jetindexd
- jetmongod - The jetmongod service is JetBackup's MongoDB service. This stores all information regarding the JetBackup Configuration. Check its status using the following command:
/usr/bin/systemctl status jetmongod
- jetlighttpd - The jetlighttpd service is only available on JetBackup 5 for Linux servers. This service generates the JetBackup 5 UI for Linux Systems that do not have a control panel. Check its status using the following command:
/usr/bin/systemctl status jetlighttpd
If you ever notice any issues/errors with these services it may be a good idea to restart the services. Please note that restarting either of these services will abort any Processing Queue Items. Restart the services using the following command:
/usr/bin/systemctl restart {jetbackup5d/jetindexd/jetmongod/jetlighttpd}
JetBackup 5 Supplemental Log Locations
JetBackup 5 stores supplemental logs on the server for many different processes. The JetBackup 5 Log directory can be located at /usr/local/jetapps/var/log/jetbackup5. From here, the log file structure is as follows:
/usr/local/jetapps/var/log/jetbackup5/
├── jetbackupapi.log
├── jetbackupd.log
├── queue
│   ├── #_{ID}
│   │   └── {ITEMID}.log
│   ├── #_{ID}.items
│   ├── #_{ID}.log
└── s3
   └── s3.log
- jetbackupapi.log - The jetbackupapi.log contains the list of all jetbackup5api calls that were made via the terminal or GUI.
- jetbackupd.log - The jetbackupd.log is the log that contains information regarding the jetbackup5d service. Any errors on the service will appear here.
- queue - The queue log directory contains the logs for all Queue Items. The # indicates the Queue Type and the {ID} is the Log Item ID.
- s3 - The s3 log directory contains the errors logs from S3 Vendors. If JetBackup 5 retries an HTTP Request, it will be logged here with the respective error code reported from the S3 Vendor.
Characters to Avoid when naming Files and Folders
While JetBackup supports almost any characters for filenames (UTF-8), there are special characters/symbols that are generally best avoided as there are specific limitations across various filesystems and storage destinations which can cause unintended issues with your backups.
This list is not exhaustive and is meant to help determine and avoid errors regarding filenames and your backups.
| # pound | % percent | & ampersand | { left curly bracket |
|---|---|---|---|
| } right curly bracket | \ back slash | < left angle bracket | > right angle bracket |
| * asterisk | ? question mark | / forward slash | blank spaces |
| $ dollar sign | ! exclamation point | ' single quotes | " double quotes |
| : colon | @ at sign | + plus sign | ` backtick |
| | pipe | = equal sign |
File Permissions to Avoid
Error: rsync: [generator] failed to set permissions ... Inappropriate file type or format . In such cases, our recommendation is to set an appropriate permission for the problematic files.-rw---x--t-rwsr-Sr-THow To Secure Backup Storage
Prior to adding a destination to JetBackup, we advise securing the backup directory, so that only the allowed users can access that folder.
mkdir [-p] /mnt/backup_vol/jetbackup
Then we advise securing that destination so only one user can access it's content (except root)
useradd <jetbackup>
chown jetbackup:jetbackup /mnt/backup_vol/jetbackup
chmod 700 /mnt/backup_vol/jetbackup
Right now, only users root and jetbackup can access this directory.
Please search online, how to secure a backup folder for your particular file system (EXT, NTFS, FAT, etc..) on your system (Windows, Linux, macOS, BSD, etc..)
For more information, and a good start point please visit File System Permissions
Now, when adding that destination in JetBackup GUI, the specified Backup Directory should be the directory you have just created and secured: ie /mnt/backup_vol/jetbackup
Can I use NFS for backup storage?
NOTE: JetBackup utilizes rsync when backing up to an NFS destination. Ensure your version of NFS has full support for rsync.
Can I delete backups directly from JetBackup?
JetBackup does not allow backup deletion manually or on-demand directly from JetBackup.
The recommended way is to set up the appropriate retentions and filters on your Backup Job(s) associated with the backups you prefer to delete as well as adjust your Manual/Orphan Backup TTL settings and let JetBackup execute its automatic cleanup.
Additionally, it is possible (though not recommended) to manually delete backups directly on your destination. Once backups have been deleted manually the destination must be reindexed before JetBackup will reflect the change made at the destination. This can be done in 2 ways:
Reindexing the Destination via the JetBackup5 GUI.
jetbackup5api -F reindexDestination -D '_id={DESTINATION_ID}'
{DESTINATION_ID} should be replaced with the ID of the destination being reindexed
NOTE: Due to the storage type (Object Storage) utilized by S3 destinations, it is not possible to delete a single snapshot. Instead, all backups for an account must be deleted. More info on the comparison between S3 and traditional file structures can be found here
I terminated an account and the backup has been deleted. How can I restore it?
Jetbackup will store the backups for a deleted account as an Orphan under "Accounts -> View Orphan Accounts". These backups by default will be stored for 180 days unless the setting is changed under "Settings -> General -> Delete Orphan Backups".
cPanel
Why can't I restore a suspended account in cPanel/WHM?
You may encounter the following errors when restoring an account in JetBackup:
[ERROR] Error while trying to get data from uapi. Error: Failed to parse adminbin request: Account is suspended at /usr/local/cpanel/Cpanel/AdminBin/Server.pm line 101.
Error while trying to get data from uapi. Error: Could not remove entries belonging to “email@example.com” from the “testaccount” Horde database., Failed to parse adminbin request: Account is suspended at /usr/local/cpanel/Cpanel/AdminBin/Server.pm line 101.
How to restore accounts with unregistered domains?
WHM by default sets the Allow unregistered domains as disabled. This can cause the restore of accounts that have unregistered or expired domains to fail. This can be seen in the Restore Log as the following message: Please make sure that the domain is registered with a valid domain registrar.
In order restore the account, you can temporarily enable this setting by navigating to WHM -> Domains -> Allow unregistered domains and changing the value to on. Requeue the restore and once complete you may disable this setting again.
How to Lock Suspended Account's Backups
The following Bash script, based on the blog post JetBackup: Better Safe Than Sorry, allows you to automatically lock backups for a set number of days when an account gets suspended and subsequently unlocks when it gets unsuspended. When the script is triggered (via cPanel hooks), it subsequently locks LOCK_BACKUPS number of backups for a LOCK_PERIOD number of days.
Here are the steps to create the BAsh script and register to the cPanel/WHM Hooks System:
- Create an executable bash file
touch /root/lock_unlock_acct.sh
chmod +x /root/lock_unlock_acct.sh
- Copy the following script to the bash file you created on Step 1.
#!/bin/bash
STAGE=$1
LOCK_PERIOD=360
LOCK_BACKUPS=1
LOCK_REASON="locked-by-hook"
ACCT=$( cat /dev/stdin | grep -oE '"args":{[^}]*"user":"[^"]+"' | sed "s#^.*\"user\":\"\([^\"]\+\)\"#\1#g" )
#ACCT=$( cat /dev/stdin )
HOOK_LOG="/usr/local/jetapps/var/log/jetbackup5/jetbackupd.log"
if [ $STAGE = "suspend" ]; then
ACCOUNT_ID=$( /usr/bin/jetbackup5api -F listAccounts -D "find[username]=$ACCT&find[active]=1" | grep -E '^\s*_id:' | awk '{print $2}' )
#GET LATEST LOCK_BACKUPS NUMBER OF SNAP IDs
sIFS=$IFS
IFS=$'\n'
snaps=($( /usr/bin/jetbackup5api -F listBackupForTypeName -D "name=$ACCT&account_id=$ACCOUNT_ID&contains=511&type=1&sort[created]=-1" | grep -E "^\s*parent_id:" | awk '{print $2}' ))
snapsitems=($( /usr/bin/jetbackup5api -F listBackupForTypeName -D "name=$ACCT&account_id=$ACCOUNT_ID&contains=511&type=1&sort[created]=-1" | grep -E "^\s{6}_id:" | awk '{print $2}' ))
IFS=$sIFS
TOTAL_SNAPS=${#snaps[@]}
[[ $TOTAL_SNAPS -lt $LOCK_BACKUPS ]] && LOCK_BACKUPS=$TOTAL_SNAPS
for (( i=0; i<$LOCK_BACKUPS; i++ )); do
#LOCK SNAP BY ID
/usr/bin/jetbackup5api -F manageBackupLock -O json -D "_id=${snaps[$i]}&locked=1&lock_ttl=$LOCK_PERIOD"
/usr/bin/jetbackup5api -F manageBackupNotes -O json -D "_id=${snapsitems[$i]}¬es=$LOCK_REASON"
done
fi
if [ $STAGE = "unsuspend" ]; then
ACCOUNT_ID=$( /usr/bin/jetbackup5api -F listAccounts -D "find[username]=$ACCT&find[active]=1" | grep -E '^\s*_id:' | awk '{print $2}' )
#GET LOCKED SNAPS BY THE LOCK REASON AND THE ACCOUNT NAME
sIFS=$IFS
IFS=$'\n'
snaps=($( /usr/bin/jetbackup5api -F listBackupForTypeName -D "name=$ACCT&account_id=$ACCOUNT_ID&contains=511&type=1&sort[created]=-1" | grep -E "^\s*parent_id:" | awk '{print $2}' ))
snapsitems=($( /usr/bin/jetbackup5api -F listBackupForTypeName -D "name=$ACCT&account_id=$ACCOUNT_ID&contains=511&type=1&sort[created]=-1" | grep -E "^\s{6}_id:" | awk '{print $2}' ))
IFS=$sIFS
for (( i=0; i<$LOCK_BACKUPS; i++ )); do
#UNLOCK SNAP BY ID
/usr/bin/jetbackup5api -F manageBackupNotes -O json -D "_id=${snapsitems[$i]}¬es="
/usr/bin/jetbackup5api -F manageBackupLock -O json -D "_id=${snaps[$i]}&locked=0&lock_ttl="
done
fi
- Register the Bash script inside cPanel's Hooks System by executing the following commands:
/usr/local/cpanel/bin/manage_hooks add script "/root/lock_unlock_acct.sh suspend" --manual 1 --category Whostmgr --event Accounts::suspendacct --stage post
/usr/local/cpanel/bin/manage_hooks add script "/root/lock_unlock_acct.sh unsuspend" --manual 1 --category Whostmgr --event Accounts::unsuspendacct --stage post
Linux
How to Add/Change SSL Certificates on JetBackup 5 for Linux
SSL certificates adds another layer of security when accessing your JetBackup 5 for Linux Panel by encrypting sensitive information such as your login credentials as they are sent between your server and browser.
JetBackup generates its own SSL certificate automatically upon installation.
To add your own SSL certificate, edit the JetBackup configuration file located here:
/usr/local/jetapps/etc/jetlighttpd/conf.d/jetbackup5.conf
Change the following line on the config file:
ssl.pemfile = "/usr/local/jetapps/etc/ssl/private/jetbackup5.pem"
And specify the path to your SSL certificate:
ssl.pemfile = "{SSL_CERTIFICATE_PATH}"
For SSL Certificates provided by Let's Encrypt, it is possible to assign more lines in the config file as follows:
ssl.privkey = "/PATH/TO/####.domain.net/privkey.pem"
ssl.pemfile = "/PATH/TO/####.domain.net/cert.pem"
ssl.ca-file = "/PATH/TO/####.domain.net/chain.pem"
Save the config file then restart the jetlighttpd service:
systemctl restart jetlighttpd
If using a single .pem file, the file must contain both the Private Key and Certificate with the following format:
-----BEGIN PRIVATE KEY-----
...
-----END PRIVATE KEY-----
-----BEGIN CERTIFICATE-----
...
-----END CERTIFICATE-----
Disk Usage/Inode Usage N/A on JetBackup 5 for Linux
Since JetBackup 5 for Linux does not have an associated panel to gather account information, JetBackup 5 must calculate these details manually. In order to do this, you must have the repquota tool installed on your linux server. For more information on how to install the repquoata tool, please visit their documentation: repquota.
Once repquota is installed and configured run the following command to verify:
repquota -a
You should get a list of all the linux users on your system along with their configured Disk Usage/Inode Usage Limits. After verifying the command works properly, restart the jetbackup5d service to resync the accounts.
/usr/bin/systemctl restart jetbackup5d
PostgreSQL - Failed to connect when assigning Databases
Some postgres installations may have authentication issues as it defaults to scram-sha-256 authentication type. You can verify if there's an authentication issue with your PostgreSQL installation when you try to assign a database with the postgres engine on JetBackup's Manage Database Plugin.
SCRAM authentication for PostgreSQL requires the libpq v10 PHP package or above installed. As a workaround, you may switch your authentication type to md5. On a PostgreSQL v13 installation for example, you need to set the following configuration files then restart the postgres service:
/var/lib/pgsql/13/data/postgresql.conf:
password_encryption = md5 # md5 or scram-sha-256
/var/lib/pgsql/13/data/pg_hba.conf:
host    all             all             127.0.0.1/32            md5
host    all             all             ::1/128                 md5
host    replication     all             127.0.0.1/32            md5
host    replication     all             ::1/128                 md5
DirectAdmin
Custom Nameserver/Hostname and Port
JetBackup 5 uses the following DirectAdmin Configurations by default when installed:
- hostname (Default hostname of the server)
- port (Default port for DirectAdmin 2222)
With DirectAdmin Servers it is possible to customize these two configurations. In order to load JetBackup 5 on DirectAdmin with a custom Hostname/Port please add the following lines to the JetBackup 5 DirectAdmin Configuration File located at /usr/local/jetapps/etc/jetbackup5/.da.conf
hostname=HOST/IP
port=PORT