Disaster Recovery Guide
Backups generated in v5.2.11 are not compatible in v5.3+. You will need to install v5.2.11 in order to complete a Disaster Recovery with those backups. Please follow the steps HERE to install v5.2.11.
JetBackup Config Backup Job
JetBackup 5 will backup it's internal databases only when JB Config is enabled on your configured backup destinations. In order to do so, click on "Export JB Config" on your preferred Destination. Keep your DR destination details and Master Encryption Key to be able to restore from DR.
Job Configuration
The JetBackup Config Backup Job is configured to be executed every night at 01:00 AM Server Time with a total schedule retention of 3. The JetBackup Config Backup Job is an Encrypted Compressed Backup that will dump the entire JetBackup MongoDB and Jetindexd Database in order to allow for Disaster Recovery.
- Backup Structure: Compressed
- Encrypted: True
- Schedule: Daily - 01:00 AM Server Time
- Retention: 3 Total Backups
Since the JetBackup Config Backup Job is encrypted, please make sure to keep a copy of your Master Encryption Key in a secure remote location. If the original server is lost, there is no other way to retrieve the Master Encryption Key. However, you may still install a Fresh JetBackup 5 instance and restore accounts using a Read-Only Destination. For more details see How to perform Disaster Recovery without Master Encryption Key?
Disaster Recovery Best Practices
Consistent Environment Configurations
We recommend ensuring that the new environment you will be restoring to is similar to the source environment as much as possible to help limit incompatibilities between environments that may result in issues during restoration. This may include but is not limited to your Server Hardware (CPU, RAM, Hardrive), Operating System (distribution and version), web server (apache, Nginx, etc.), database (MySQL, PostgreSQL, MongoDB), Configurations and Settings, Addons and/or Extensions.
Perform Routine Recovery Testing
Testing your Disaster Recovery Plan regularly may help ensure that you have an effective and well-designed plan. Simulating Disaster Recovery scenarios may help identify potential points of failure in your current plan which can then be mitigated and/or addressed early on.
Upgrade/Migration Tips
When utilizing Disaster Recovery for Upgrade/Migration purposes, we highly recommend keeping the original server available for rollback until all accounts are restored and systems and features are verified to be functioning properly on the new server.
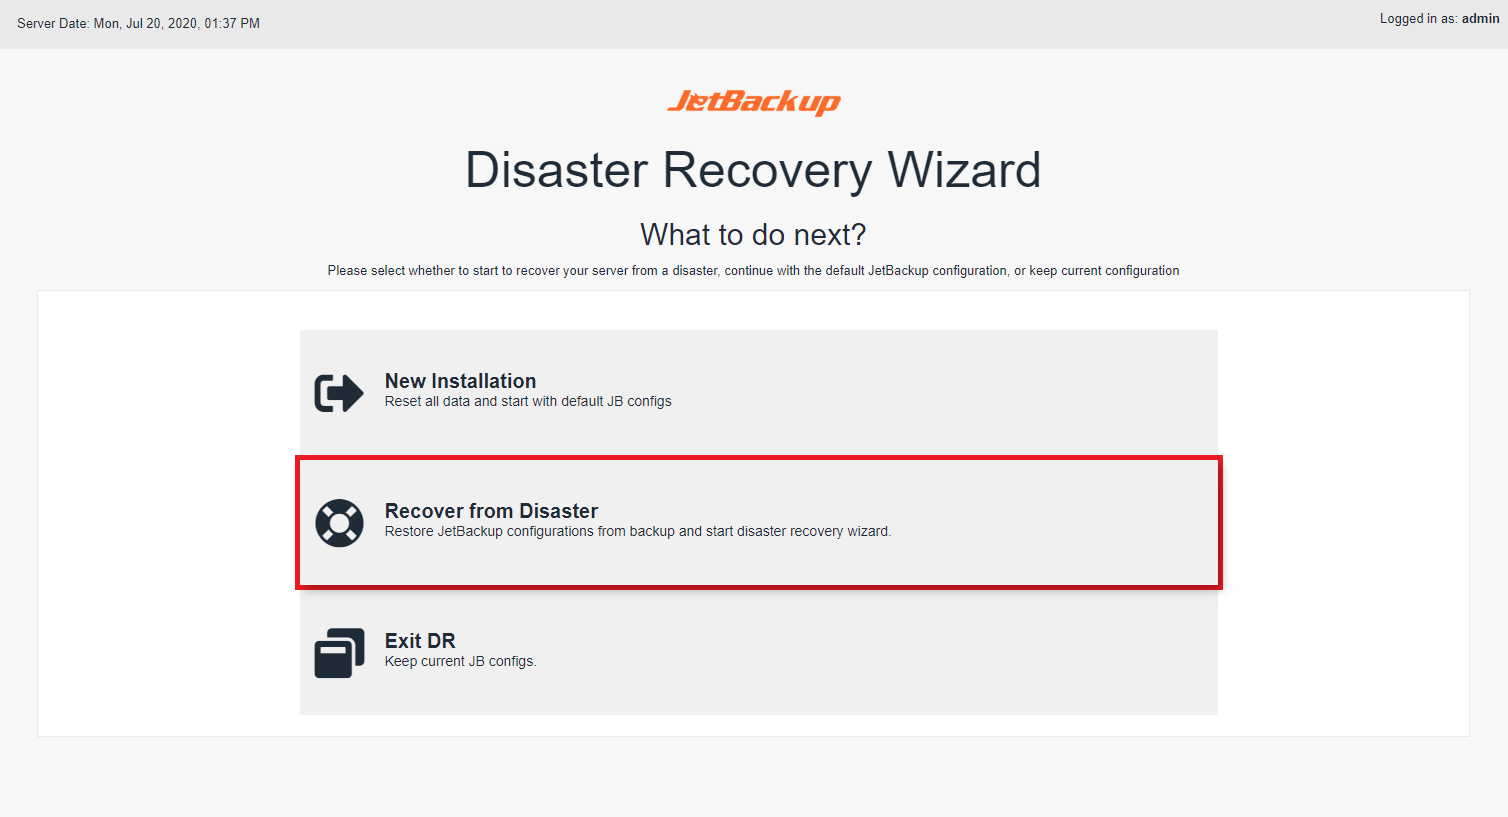
Recover from Disaster
Getting Started
Important information before starting Disaster Recovery!
- JetBackup will backup it's internal DB only when "Export JB Config" is enabled on your backup destination. In order to do so, click on "Export JB Config" on your preferred Destination. Keep your DR destination details to be able to restore from DR. The JB config backup will be executed every night and will keep a max of 3 snapshots.
- Please make sure to keep your Master Encryption Key in a secure remote location.
- There must be at least 1 User Package and/or Reseller Package (if applicable to your Panel) on the new server for JetBackup to assign the accounts to during a DR restore. Please ensure that you specify a "Default Package" in JetBackup's Panel Settings to use when the accounts backed up package is not found on the server.
- The Disaster Recovery process is not intended for cross-panel migrations. Please take a look at the "Clone Jobs" feature, if you'd like to restore accounts across different control panels.
- Restoring your JetBackup Configurations may take some time depending the number of backups indexed by JetBackup at the time the JB Config Export was generated. Please allow enough time for the JB Configurations Restore to complete to begin the Disaster Recovery process.
Initial Installation and Setup
Please have the following information available for the next steps!
- Destination Details and Backups Path for the destination where Export JB Config was enabled on your previous configuration. JetBackup will add this destination as a Read-Only Destination to pull your JetBackup Config information stored on that destination.
- Master Encryption Key This encryption key is used to decrypt your JetBackup Config Backup and is REQUIRED to restore your previous JB configuration.
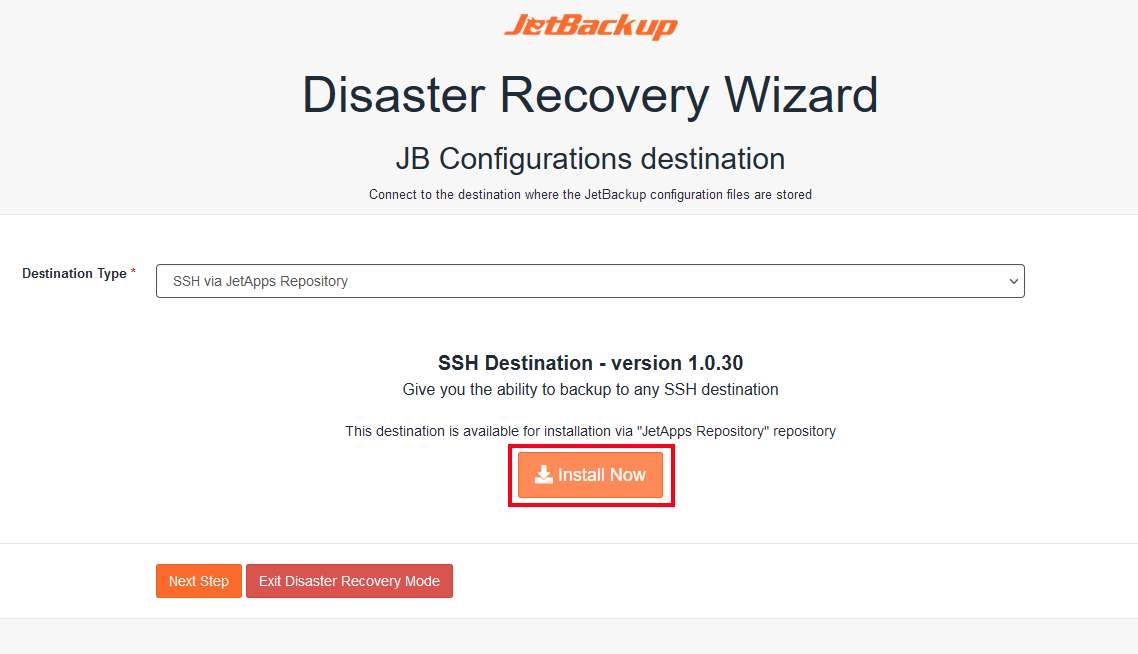
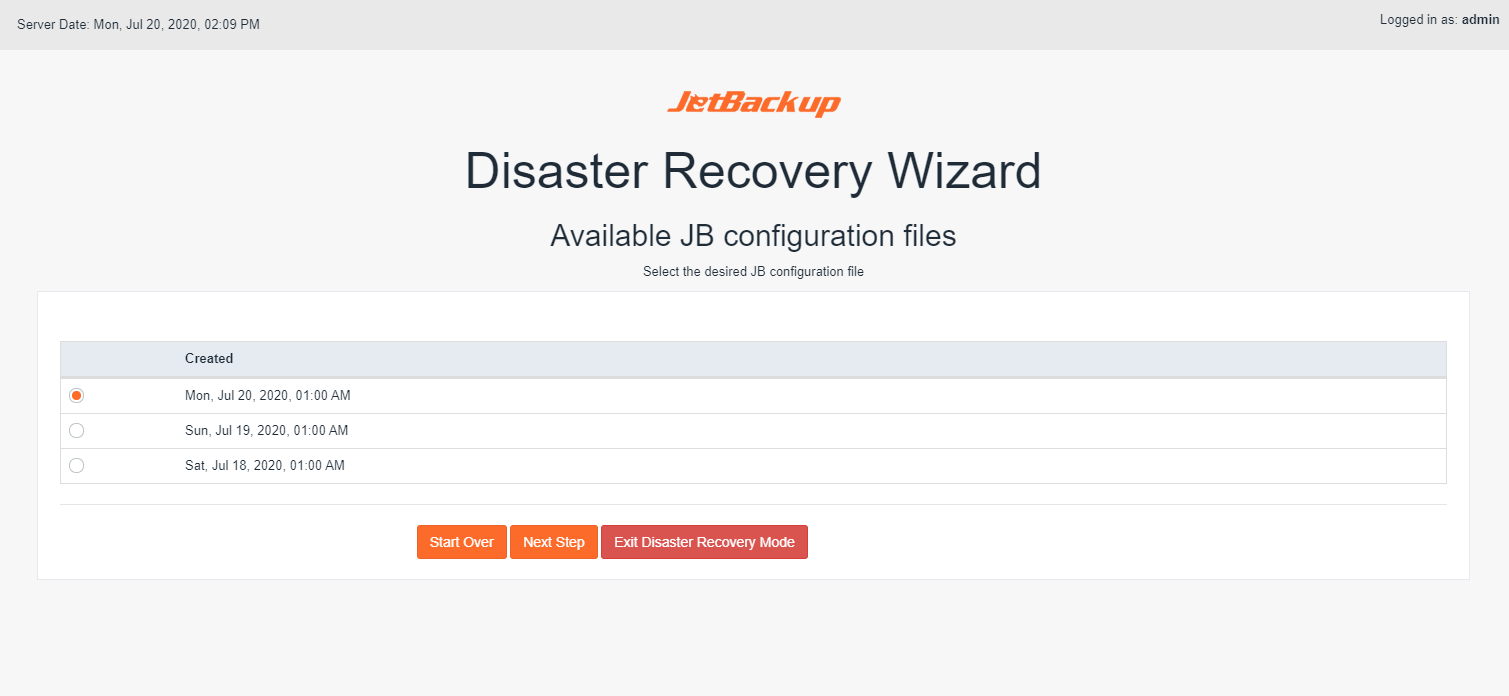
Restoring JB Configurations
The next step requires you to select your Destination Type. Any destination configured during Disaster Recovery will be added as a Read-Only Destination.
The "Local" destination is selected in the "Destination Type" dropdown by default. When restoring from a remote destination, the related destination plugin will need to be installed from the JetApps Repository first, and JetBackup will guide you through this process.
To restore JB Config, please select your destination from the "Destination Type" dropdown.

You will see the "Install Now" prompt when selecting a remote destination type.
Then enter the Destination details that you gathered earlier:
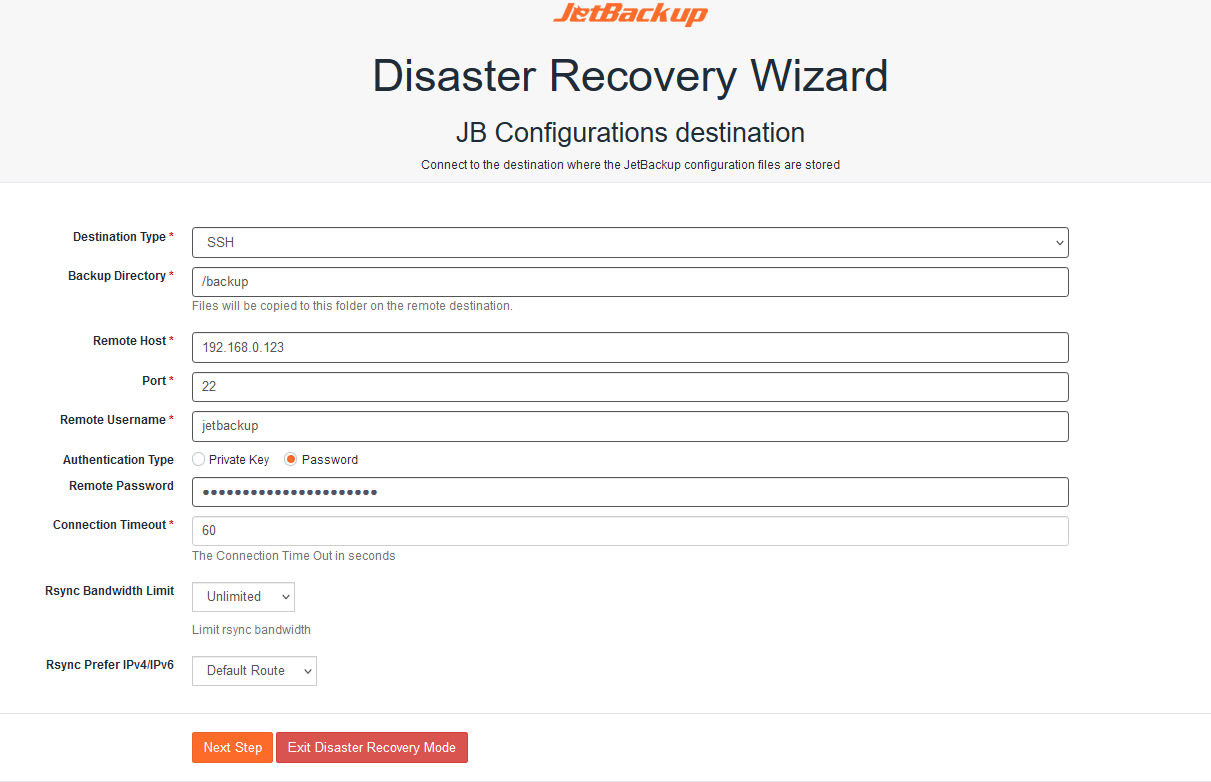
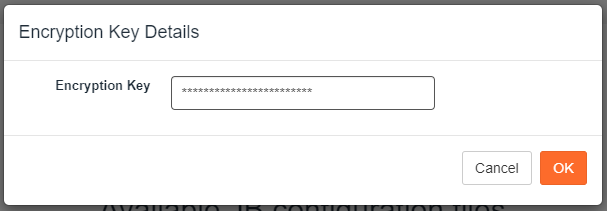
Enter the Master Encryption Key in the Encryption Key field:
This may take some time to complete, depending on the size of your JetBackup database when the JB Config backup was generated and the number of snapshots.
Please do not exit or refresh the page while the JB Configurations restore is in progress.
Once completed, you will be able to restore your accounts from the destination.
(Optional) You can set "Delete orphan backups older than" option to "Disabled" in your JetBackup Settings to prevent orphan backups from being untentionally removed.
Restoring Accounts
NOTE: JetBackup prioritizes restores by the account type out of the box. Along with the Queue Priority Groups setting, this ensures that parent accounts gets restored before their corresponding child accounts. For more Information regarding JetBackup 5's priority systems, please CLICK HERE.
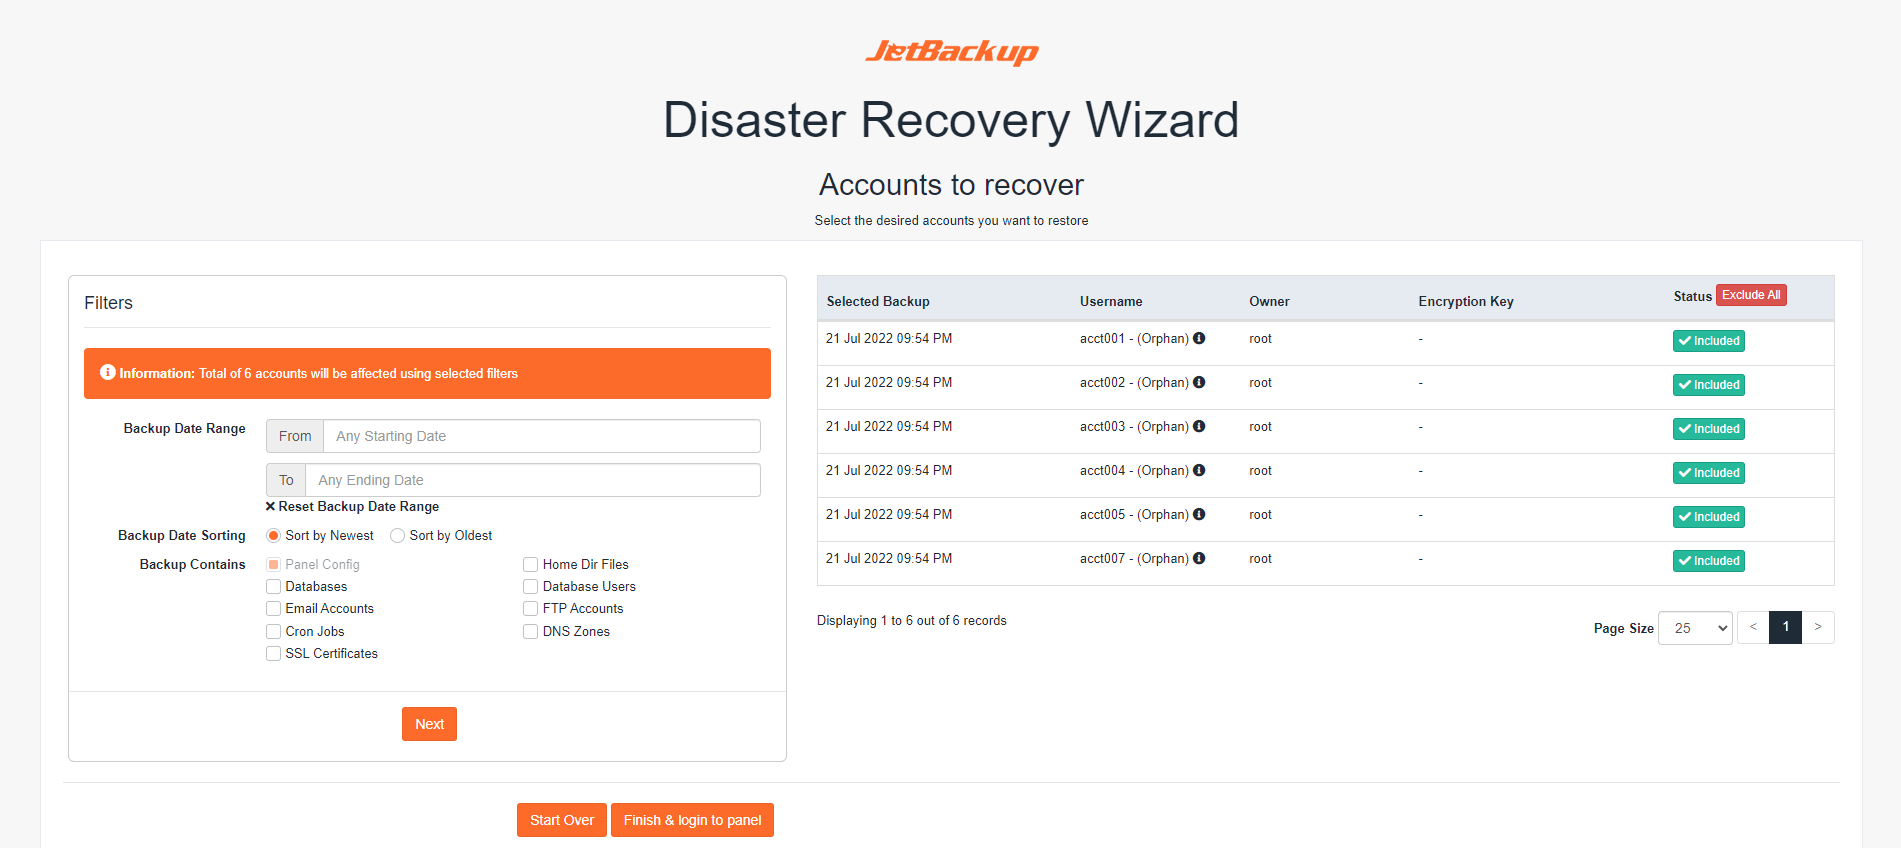
NOTE: The Disaster Recovery Wizard only lists backups from accounts that do not exist on the current server and were previously active on the source server when JetBackup generated the JB Config Backup.
Encrypted Backups
In order to restore an Encrypted Backup, it is REQUIRED to have both the JB Config and your Master Encryption Key. If the Master Encryption Key is missing, then the associated Encrypted Backups are PERMANENTLY lost in the event of a Disaster Recovery.
If a user has allowed Only Encrypted Backups, then their Encryption Key is stored locally on the server and will be tied to the JB Config. The user and admin will both be able to perform restores with the Encypted Backups.
The user can choose to store their key remotely where they will be shown the key once and be responisble for storing it in a safe place. The admin will not be able to perform any action on the Encrypted Backups. The user will have to perform restores on their end or provide the admin with the key so that they may perform it on the user's behalf.
NOTE: The JetBackup Config backup job runs daily at 1:00 AM server time. If performing a test, it MUST be after the JB Config job runs.
Post Disaster Recovery Checks
Re-Enable Export JB Config - Don't forget to re-enable "Export JB Config" on your preferred destinations! By default, all destinations will have the Export JB Config setting disabled post Disaster Recovery. You will need to re-enable them under Destination Settings.
Re-Enable Backup Jobs - Don't forget to re-enable your backup jobs! By default, backup jobs that are imported from your JB Config will be disabled. You will need to re-enable them under Backup Jobs.
Disabling Backup Jobs and Destinations on Original Server - In cases where you are migrating from a source server to a new server, please either make sure you uninstall JetBackup OR disable all Destinations and Backup Jobs on the source server to prevent potential conflicts with multiple instances of the same backup job running on 2 (or more) servers concurrently.