Cloud
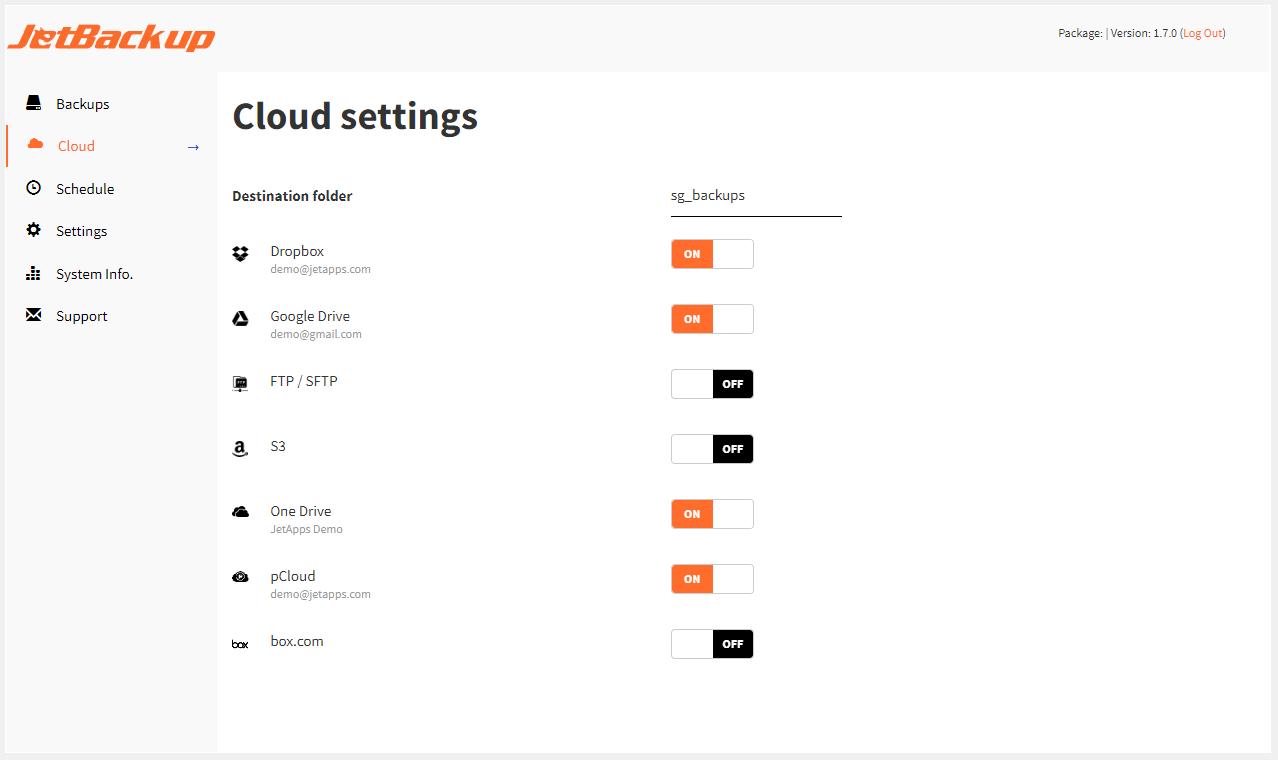
Under this section, you will have the option to connect supported cloud destinations to your plugin and specify the destination folder JetBackup will create to store your backups.
Destination folder
The folder name JetBackup will create and use to upload/store backups
to. (Default: sg_backups)
Cloud Destinations
A Cloud destination serves as a remote storage location for your backup files. Below is a list and brief overview of each supported cloud destination types so you can choose the most suitable destination for your specific needs or use case.
In general, it is almost always a best practice to make sure at least one copy of your server’s backups are located off-site (remote destination) in case of a disaster at your data center, home, or office happens.
Remote destinations are usually slower than local destinations to backup and restore from due to your network's available bandwidth, distance between where your website is hosted and where your cloud storage is located, etc. With this in consideration, many clients choose to store at least one copy of backups locally and additional copies in at least one or more remote destinations.
Supported Cloud Destinations
Dropbox
Dropbox is a cloud storage provider that allows users to store, sync and share files. JetBackup uses the Dropbox API to connect and transfer backups to your Dropbox account.
To connect Dropbox to JetBackup:
Step 1: First make sure you have a Dropbox account. To register an account, please click here.
Step 2: Open JetBackup for WordPress on your WordPress Admin Dashboard and Navigate to the Cloud Section.
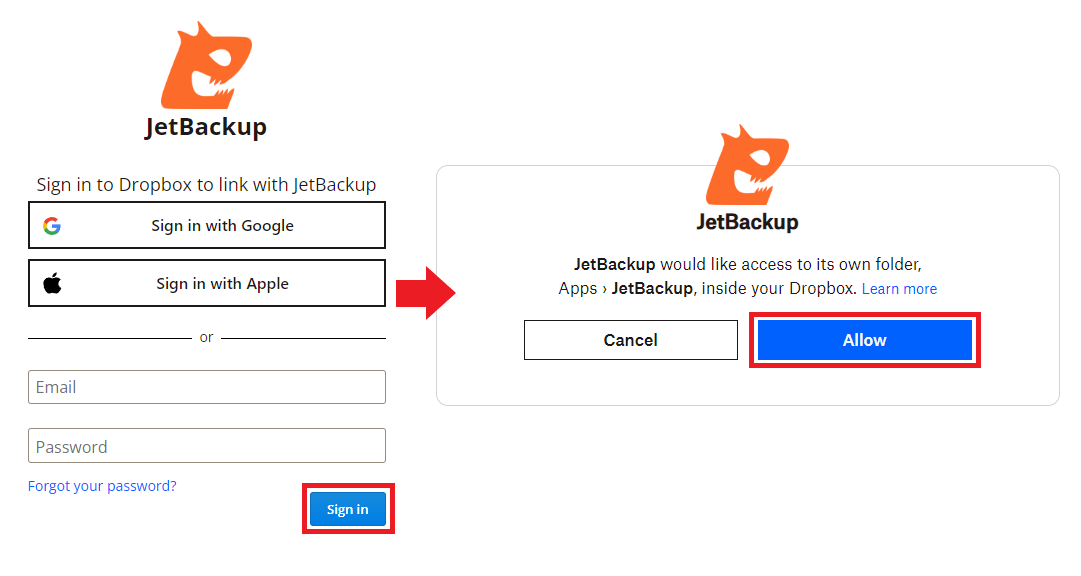
Step 3: Toggle the Dropbox switch ON and you will be asked to sign in to your Dropbox account. You may be asked to enter a security code that is sent to the email address associated with your Dropbox account.
Step 4: You will then be asked to grant JetBackup permission to create and access it's own folder on your Dropbox account.
Once completed, you will then redirected back to JetBackup and your Dropbox cloud storage is now connected to JetBackup!
Google Drive
Google Drive is a file storage and synchronization service developed by Google. It allows users to store files on their servers, synchronize files across devices, and share files. JetBackup uses the Google Drive API to transfer backups to your Google Drive cloud storage.
To connect Google Drive to JetBackup:
Step 1: First make sure you have a Google account. To register an account, please click here.
Step 2: Open JetBackup for WordPress on your WordPress Admin Dashboard and Navigate to the Cloud Section.
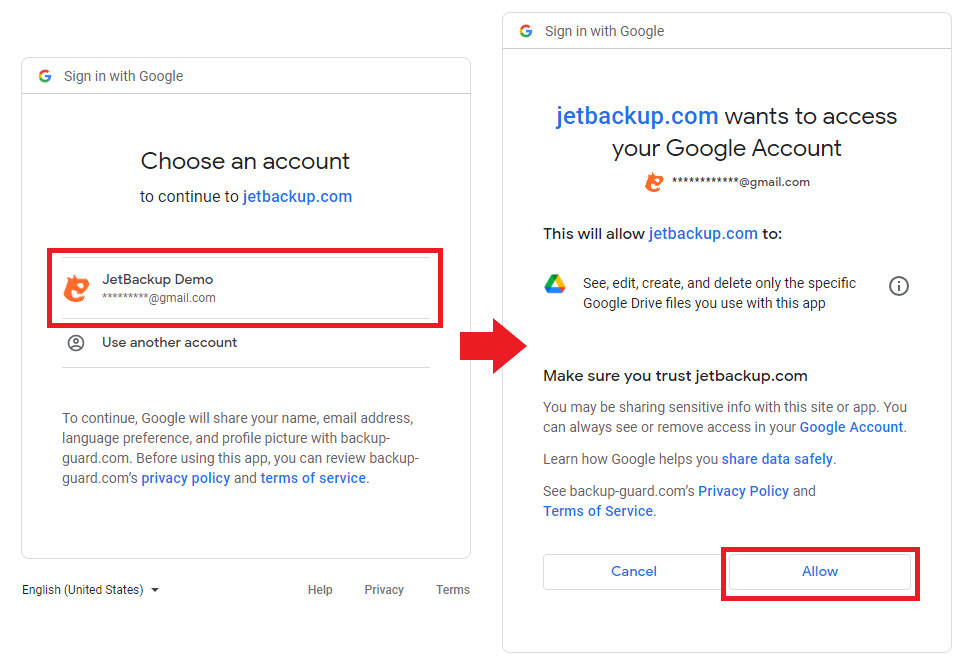
Step 3: Toggle the Google Drive switch ON and you will be asked to sign in to your Google account.
Step 4: You will then be asked to grant JetBackup permission to create and access it's own folder on your Google Drive account.
Once completed, you will then redirected back to JetBackup and your Google Drive storage is now connected to JetBackup!
FTP/SFTP
The File Transfer Protocol (FTP) is a standard network protocol used to transfer computer files from one host to another host over a TCP-based network, such as the Internet. Secure File Transfer Protocol (SFTP), on the otherhand, enables secure file transfer capabilities between networked hosts.
To connect your FTP/SFTP Server to JetBackup:
Step 1: Open JetBackup for WordPress on your WordPress Admin Dashboard and Navigate to the Cloud Section.
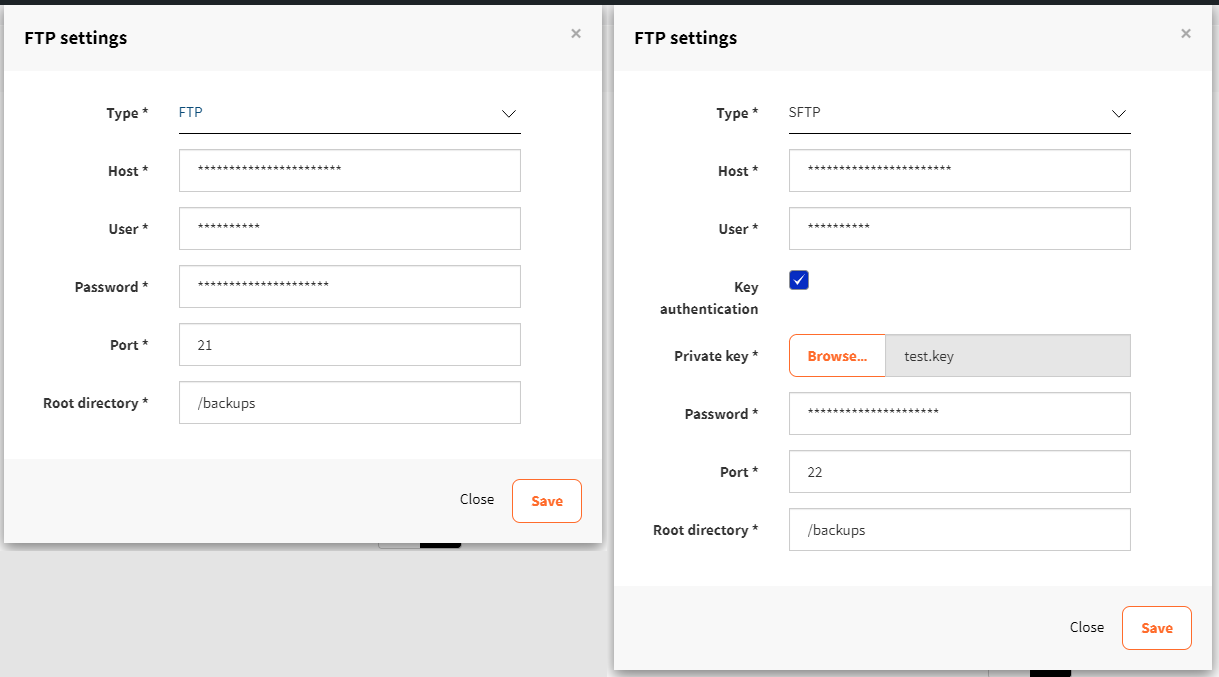
Step 2: Toggle the FTP/SFTP switch ON and you will be asked to specify your FTP/SFTP Credentials:
- Type: Choose whether you would like to connect to an FTP or SFTP server.
- Host: The hostname or IP address to access your remote FTP/SFTP server.
- User: The FTP/SFTP user JetBackup will use to log into. It is recommeded to create a dedicated (non-root) user for backups.
- Key authentication/Private key: If you slelect SFTP as your FTP server type, you also have the option to enable Key authentication and specify which Private key to use and authenticate your SFTP connection.
- Password: Password for the provided FTP/SFTP User.
- Port: Your FTP/SFTP port. Default FTP/SFTP port is
21/22 - Root directory: This will be our starting point when accessing your FTP/SFTP destination. The path is relative to the FTP/SFTP user's home dir. /home/USERNAME will be your starting point. Write your path to where you want the backup to be stored.
Step 3: Once you have all the requested fields filled, click the "Save" button and JetBackup will establish a connection to your FTP/SFTP server.
Your FTP/SFTP server is now connected to JetBackup!
S3 (Amazon & Custom S3)
Amazon S3 (Simple Storage Service) is a scalable, web-based cloud object storage service that is used for remote backups and archiving of data and applications on AWS (Amazon Web Services). You also have the option to configure a custom S3 compatible storage provider which utilizes the S3 API.
To connect Amazon S3/Custom S3 to JetBackup:
Step 1: First make sure you have an account for an Amazon S3(AWS)/S3-compatible provider. To register for an AWS account, please click here.
Step 2: Open JetBackup for WordPress on your WordPress Admin Dashboard and Navigate to the Cloud Section.
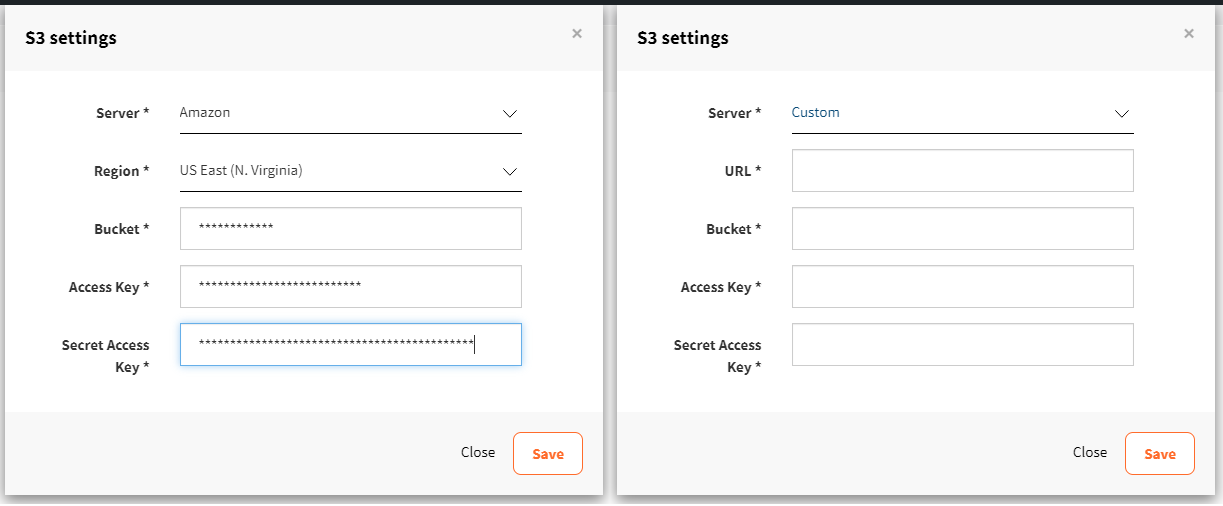
Step 3: Toggle the S3 switch ON and you will be asked to specify your S3 Credentials:
- Server: Choose whether you want to use the standard Amazon S3
provider or a Custom S3-compatible provider. (options:
Amazon | Custom) - Region/URL: If you select Amazon as your server, you would need to specify the region where your Bucket is located. Otherwise you would need specify the complete URL for your custom S3-compatible storage.
- Bucket: A Bucket is the term used for Amazon S3 and S3-compatible cloud destinations cloud storage which stores your data as objects.
- Access Key: Every S3 Destination has a Access/Secret Key Pair you must use in order to authetnicate and store data to your S3 destination.
- Secert Access Key:
Step 4: Once you have all the requested fields filled, click the "Save" button and JetBackup will establish a connection to your AWS S3/S3-compatible server.
Your AWS S3/S3-compatible server is now connected to JetBackup!
Bucket
Below is a non-exhaustive list of available S3 providers associated documentation on creating buckets for each S3 Destination.
-
Amazon S3 - How do I create an S3 Bucket
-
Digital Ocean Object Storage - Create a Space
-
Google Cloud Storage - Creating storage buckets
-
IBM Cloud Object Storage - Getting started with IBM Cloud Object Storage
-
Oracle Cloud Object Storage - Create a Bucket in Oracle Object Storage
- NOTE: After creating a bucket, take note of the Namespace under Bucket Settings for your Destination Configuration on JetBackup.
-
ScaleWay Elements - Creating a Bucket through the Scaleway Console
-
Wasabi - Creating a Bucket
Access/Secret Key Pair
Below is a non-exhaustive list of available S3 providers associated documentation on creating these pairs for each S3 Destination.
-
Amazon S3 - Managing Access keys AWS Console
-
Digital Ocean Object Storage - Creating an Access Key
-
Google Cloud Storage - Creating an HMAC Key
-
IBM Cloud Object Storage - Service credentials
- NOTE: Ensure to enable Include HMAC Credential to receive the key pair properly.
-
Oracle Cloud Object Storage - Create a Customer Secret Key
-
ScaleWay Elements - How to Generate an API Key
-
Wasabi - Creating a Wasabi API Access Key Set
OneDrive
OneDrive is a cloud storage and file hosting service operated by Microsoft. It allows registered users to upload and share files online. JetBackup uses the OneDrive API to transfer backups to your OneDrive cloud storage.
To connect OneDrive to JetBackup:
Step 1: First make sure you have a Microsoft account. To register an account, please click here.
Step 2: Open JetBackup for WordPress on your WordPress Admin Dashboard and Navigate to the Cloud Section.
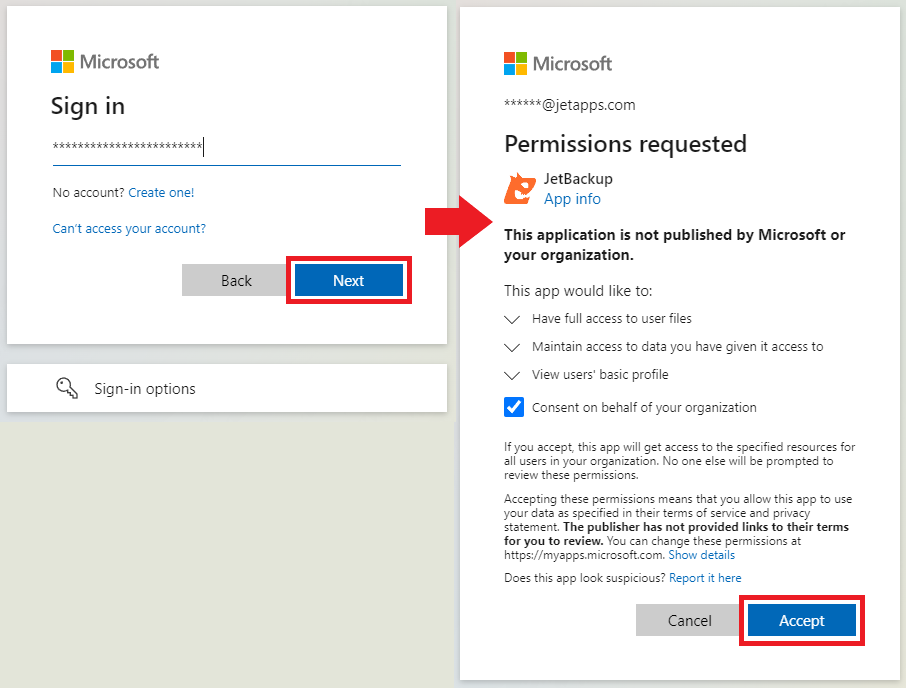
Step 3: Toggle the OneDrive switch ON and you will be asked to sign in to your OneDrive(Microsoft) account.
Step 4: You will then be asked to grant JetBackup permission to access and upload to your OneDrive account.
Once completed, you will then redirected back to JetBackup and your OneDrive account is now connected to JetBackup!
pCloud
pCloud provides a secure cloud storage and file hosting service for indiviudals and businesses. It allows users to store and share files online across all devices. JetBackup uses the pCloud API to transfer backups to your pCloud cloud storage.
To connect pCloud to JetBackup:
Step 1: First make sure you have a pCloud account. To register an account, please click here.
Step 2: Open JetBackup for WordPress on your WordPress Admin Dashboard and Navigate to the Cloud Section.
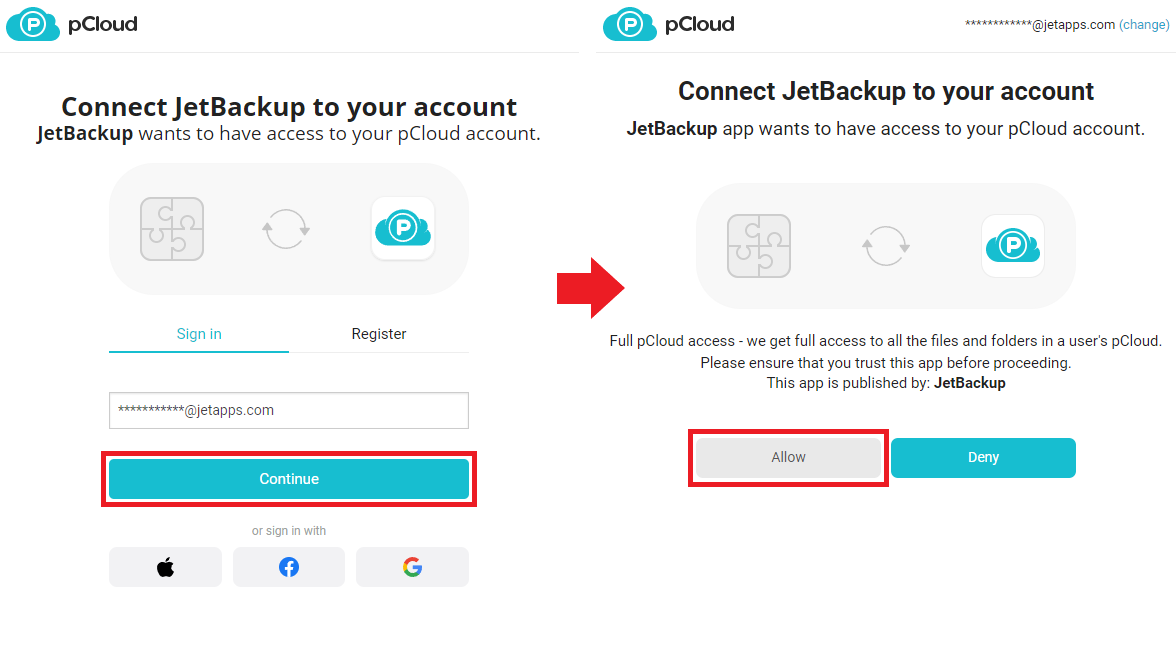
Step 3: Toggle the OneDrive switch ON and you will be asked to sign in to your pCloud account.
Step 4: You will then be asked to grant JetBackup permission to access and upload to your pCloud account.
Once completed, you will then redirected back to JetBackup and your pCloud account is now connected to JetBackup!
box.com
Box is a cloud-based company that develops content management, collaboration, and file sharing services for businesss. Box allows registered users to upload and share files online for team collaboration. JetBackup uses the Box API to transfer backups to your Box cloud storage.
To connect box.com to JetBackup:
Step 1: First make sure you have a box.com account. To view the available tiers and register an account, please click here.
Step 2: Open JetBackup for WordPress on your WordPress Admin Dashboard and Navigate to the Cloud Section.
Step 3: Toggle the box.com switch ON and you will be asked to sign in to your box.com account.
Step 4: You will then be asked to grant JetBackup permission to access and upload to your box.com account.
Once completed, you will then redirected back to JetBackup and your pCloud account is now connected to JetBackup!
Feedback
Was this page helpful?
Glad to hear it! Please tell us how we can improve.
Sorry to hear that. Please tell us how we can improve.
