FAQ
Can JetBackup Storage use S3 API?
JetBackup Storage utilizes the S3 protocol, which is the same protocol used by AWS S3. This means that while the underlying infrastructure may differ, our solution is fully compatible with the S3 API, enabling seamless integration with tools, applications, and services that support this widely used protocol.
This gives you the flexibility to interact with our storage just like you would with AWS S3, including using existing S3-compatible clients, APIs, and software. However, it is important to note that our solution is hosted independently of AWS, and we manage it within our infrastructure. This allows us to offer the benefits of the S3 protocol with a different pricing model, security, and performance enhancements tailored for JetBackup.
How to collect HAR log
Introduction
HAR (HTTP Archive) logs can help us diagnose and troubleshoot any issues you might be experiencing with our service. These logs record the data that is exchanged between your web browser and our servers. This guide will walk you through the process of collecting these logs using your browser’s development tools.
Step-by-step guide
Step 1: Start Collecting HAR Log
-
Open your preferred web browser. (This guide will assume you are using Google Chrome, but the process should be similar for most modern web browsers.)
-
Navigate to the web page where you’re experiencing issues.
-
Right-click anywhere on the page and select ‘Inspect’ from the context menu. This will open the browser’s development tools.
-
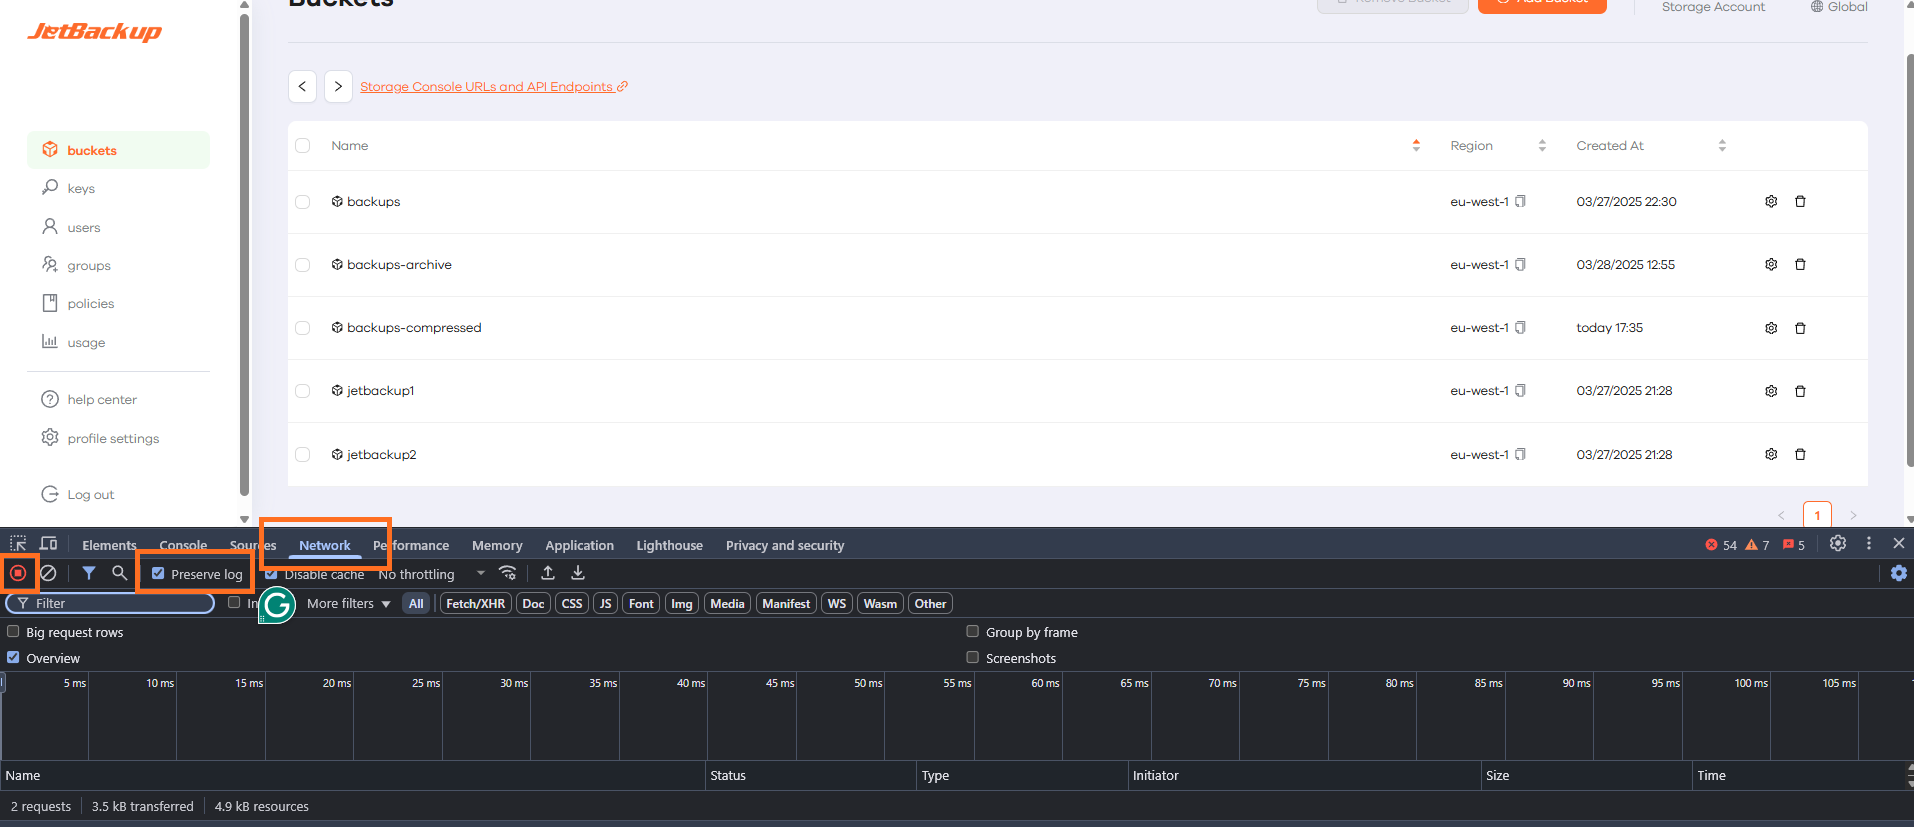
In the development tools pane, find and click on the ‘Network’ tab.
-
Ensure the ‘Preserve log’ checkbox is ticked. This ensures that all network data is recorded, even when navigating to a new page.
-
To start recording the network log, ensure that the ‘Record’ button is red (that means it’s recording). If it’s not red, please click the round button in the top left corner of the ‘Network’ tab so that it turns red.
Step 2: Reproduce the Issue
With the network log recording now active, reproduce the steps that lead to the issue you’re experiencing. Try to limit your activity during the recording to the actions necessary to reproduce the issue to keep the log file as clean as possible
Step 3: Stop Collecting HAR Log
Once you’ve reproduced the issue, return to the ‘Network’ tab of the development tools and click the round ‘Record’ button again to stop the recording. The button will return to its default grey color.
Step 4: Save the Collected Log into a File
Click on the ‘download’ icon on the development panel to download the HAR log sanitized from sensitive data:

Step 5: Send the Log File to Support
Now that you have the HAR log file saved, you can attach it to an email and send it to our support team for analysis.
Please note: HAR files may contain sensitive information, such as cookies and authentication tokens. You may want to review the file and remove any sensitive information before sending it.
Remember, the more information you provide, the easier it will be for us to diagnose the issue. Please include a description of the issue, the steps you took to reproduce it, and any other relevant details.
How does pricing work?
We offer a genuinely enterprise-grade product and provide transparent and predictable pricing (see our pricing webpage). Avoid billing surprises and experience the following benefits:
-
No minimum storage time: While most cloud providers charge a prorated fee for deleted objects, at JetBackup Storage you only pay for what you store.
-
Fair minimum file size: While other cloud providers require you to pay exorbitant fees even for small files, at JetBackup Storage you are charged for increments of 1 GB² - and without any additional fees in our subscription models.
-
No outrageous egress fees: While other cloud providers charge exceptionally high egress fees, at JetBackup Storage you will face no such surprises.
-
No API call fees: While other cloud providers make you pay to send and access data, at JetBackup Storage these API calls are without additional fees.
Our pricing model is without surprises. We have a simple Pay-per-Use model and custom pricing for Reserved Capacity Plans with a minimum subscription period of 12 months.
| Pay-per-use | Reserved capacity | |
|---|---|---|
| $ per TB storage per month | 9.95 | Custom |
| Monthly fee | - | Custom |
| $ per TB egress per month | -¹ | -¹ |
What are the rules for setting a password?
There are a few rules to be kept in mind when setting a user password for the first time or when resetting your own password. It must contain:
-
At least 8 characters
-
At least 3 of the following:
-
Lowercase letters (a-z)
-
Uppercase letters (A-Z)
-
Numbers (0-9)
-
Special characters (e.g. !@#$%^&*)
-
What are the rules for naming bucket
Choose a bucket name that reflects the objects you will store in that bucket as it is visible in the URL. In addition to this best practice, there are a few rules to be considered when naming buckets:
-
It must be unique across existing bucket names at JetBackup Storage
-
It must be between 3 and 63 characters long
-
It can contain only lowercase characters, numbers, hyphens and dots
-
It must begin and end with a letter or number
-
It cannot contain the following:
-
Consecutive dots
-
Adjacent dots
-
Adjacent hyphens and dots
-
Entire name formatted as an IP address - e.g., 192.168.1.1
-
xn--as a prefix -
-s3aliasas a suffix
-
Valid name examples - unless already used - are: ‘sales-archive’ or ‘20230101-sales-material’.
How to retrieve your CanonicalID
What is CanonicalID
-
CanonicalID plays an important role in specific requests or issue investigations conducted by JetBackup Storage representatives.
-
CanonicalID is represented as a distinct string of symbols, ensuring its uniqueness for each user.
-
This unique identifier is also required when utilizing “aws iam” commands.
How to retrieve the CanonicalID
-
Log in to the JetBackup Storage console.
-
Hover your mouse cursor over your username located in the bottom left corner of the screen.
-
Your CanonicalID will appear with the button to copy it to the clipboard.
How to delete thousands of objects via aws cli?
Introduction
While our user interface is great for managing a few objects, it might become less efficient when dealing with thousands or tens of thousands of objects. In these cases, using the Command Line Interface (CLI) can be much more effective.
How to delete multiple in a bucket of objects using CLI
Step 1. Install AWS CLI
First, you need to install the AWS CLI on your local machine. Follow the instructions in our guide.
Step 2. Configure your profile
Once AWS CLI is installed, you need to configure your profile. This profile includes the security credentials that the AWS CLI uses to interact with AWS services. You can set up your profile by following the instructions in our guide.
Step 3. Run the Delete Command
Now, you’re ready to delete multiple objects from your bucket. Please replace the placeholders in the command below with your actual details:
--recursive parameter will delete all data within the specified path!
aws s3 rm s3://your-bucket-name/path-to-your-folder-name/ --recursive --profile jetbackup --endpoint-url https://us-west-1.storage.jetbackup.com --region us-west-1
-
s3://your-bucket-name/path-to-your-folder-name/: Replace this with your bucket name and the path to the folder you’d like to clean up. -
your-profile: Replace this with the name of the profile you created in Step 2. -
--endpoint-url: Replace this with your endpoint URL. -
--region: Replace this with your region.
Feedback
Was this page helpful?
Glad to hear it! Please tell us how we can improve.
Sorry to hear that. Please tell us how we can improve.